

Getting started
cv4pve-vdi runs on the user’s computer (a workstation, a laptop, a thin client) and talks to the Proxmox VE REST API on port 8006. Nothing is installed on the nodes.
Installation
Section titled “Installation”cv4pve-vdi is a single executable. The shared release workflow publishes a zip for each system and the WinGet package:
| Platform | How |
|---|---|
| Linux | wget https://github.com/Corsinvest/cv4pve-vdi/releases/latest/download/cv4pve-vdi-linux-x64.zip && unzip cv4pve-vdi-linux-x64.zip && chmod +x cv4pve-vdiARM: cv4pve-vdi-linux-arm64.zip, cv4pve-vdi-linux-arm.zip |
| Windows (WinGet) | winget install Corsinvest.cv4pve.vdi |
| Windows (manual) | cv4pve-vdi.exe-win-x64.zip, also x86 and arm64 |
| macOS (manual) | cv4pve-vdi-osx-arm64.zip or cv4pve-vdi-osx-x64.zip |
Binaries are self-contained: no .NET runtime to install. All files are on thelatest release page.
WinGet installs the cv4pve-vdi command; from a zip, start the extracted executable. There is no
Homebrew formula, macOS .pkg, .deb, .rpm or AUR package for cv4pve-vdi.
Install remote-viewer
Section titled “Install remote-viewer”SPICE and VNC consoles open in remote-viewer, the viewer of the virt-viewer project. cv4pve-vdi does not
look for it: until its path is set, the main window shows remote-viewer is not configured: SPICE and
VNC consoles will not work with an Open Settings button. RDP, SSH and the other
services do not need it.
winget install RedHat.VirtViewerThe viewer is C:\Program Files\VirtViewer v<version>\bin\remote-viewer.exe, e.g. VirtViewer v11.0-256.
The installer is also on the SPICE download page.
sudo apt install virt-viewer # /usr/bin/remote-viewersudo dnf install virt-viewer # /usr/bin/remote-viewerSee the SPICE macOS client page.
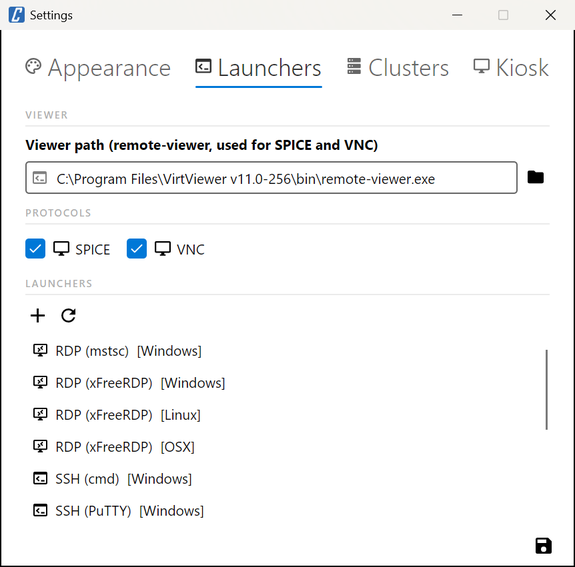
Then set its path in Settings → Launchers → Viewer path (the folder button opens a file picker):
Add your cluster
Section titled “Add your cluster”-
Start cv4pve-vdi. The login window opens.
-
Click the gear next to Cluster (Manage clusters), then + to add a cluster.
-
Fill in the cluster:
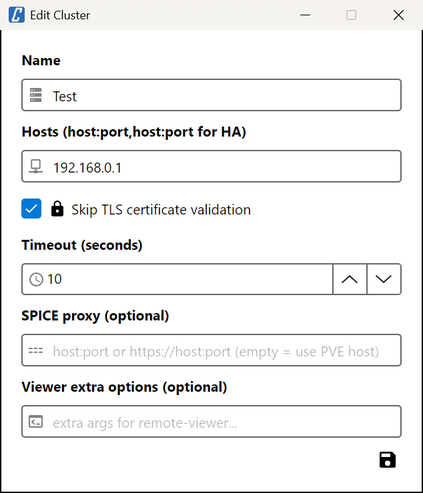
Field What to enter Name The name shown in the login window, e.g. prod.Hosts One or more nodes as host[:port], comma-separated:pve1.example.com,pve2.example.com:8006. The port defaults to 8006. At login cv4pve-vdi uses the first host that answers, so the cluster stays reachable while a node is down.Skip TLS certificate validation For nodes with the self-signed certificate Proxmox VE installs by default. Leave it off when the nodes have a trusted certificate. Timeout (seconds) How long to wait for each host. Default 10, from 5 to 120. SPICE proxy Optional, see How it connects. Viewer extra options Optional arguments added to remote-viewerfor this cluster, e.g.--full-screen. -
Click the save button of the dialog, then Save in Settings.
Add one entry per cluster; the login window lets you pick which one to open.
Log in
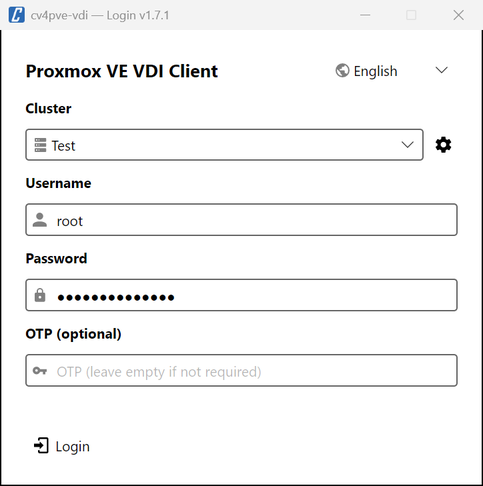
Section titled “Log in”Log in with a Proxmox VE account, the same you would use in the web interface:
- Username with its realm:
alice@pve,alice@pam, oralice@<your LDAP/AD realm>. The last username is filled in next time. - Password.
- OTP: the code from the authenticator app, or
recovery:<key>for one of the recovery keys; only for accounts with two-factor authentication.
The globe menu at the top right changes the language of the interface; see Languages.
cv4pve-vdi logs in with a user and password, not with an API token: the account belongs to the person in front of the screen, and its password can be passed on to RDP for single sign-on. What the account may see and do is set in Proxmox VE: see Permissions.
- The main window: which VMs appear, filters, Start and Shutdown.
- SPICE and VNC: when each console is offered.
- Services: RDP and SSH to a VM.